Custom Domain E-mails With Postfix and Gmail: The Missing Tutorial
Custom domain e-mail addresses, like john@johnscompany.com, are cool and professional-looking. On the other hand, Gmail has great reliability, speed, spam filtration, and app support. Wouldn’t it be great if we could send and receive e-mail as john@johnscompany.com, but right from the comfort of our Gmail account?
Today, if we want to use Gmail to send and receive e-mails on a custom domain, we have a couple of options:
- Google Apps for Work is Google’s own offering. It’s simple to set up and manage, but it’s pretty pricey at $5/mo per user, especially if we don’t need the bundled collaborative features like Google Docs and Calendar.
- Third-party services could get the job done at a lower price point; for example, Pobox offers plans starting at $20/yr. The downside is that we will have to trust another organization with our e-mail.
- Set up our own e-mail forwarding server. It’s fairly easy (if we follow this guide :) and if we already have shared / dedicated hosting or a VPS, this is basically free and gives us total control over our e-mail.
If you want to host custom domain e-mails in Gmail without paying for Google Apps or a third-party service, this tutorial is for you. It will show you how to quickly set up you own e-mail forwarding / relay server, and how to integrate it seamlessly with Gmail.
Prerequisites
For this tutorial, we’ll assume we have access to:
- VPS or shared / dedicated hosting, with a dedicated IP address and capable of listening on ports 25 and 587. We will use a Ubuntu server for the examples.
- DNS records for our domain. How DNS records are manipulated depends on the DNS hosting provider (or DNS server configuration).
We’ll assume
- We have a domain
example.com; - We have a server
myserver.example.com; - We want to use the Gmail account
john123@gmail.comto managejohn@example.com.
Step 1: DNS Setup
The first step in setting up our e-mail forwarding server is to add MX, PTR and SPF DNS records for our server. This is really important as many e-mail providers, in order to prevent spam, will refuse to talk to mail servers without proper MX, PTR and SPF records set up. How to update DNS records will depend on the DNS hosting provider.
The following is what we need:
- An MX record for
example.com, pointing tomyserver.example.com. - An A record for
myserver.example.com, pointing to the IP address of our server. - A PTR (reverse DNS) record mapping the IP address of our server to
myserver.example.com. - A TXT record, with key
example.comand valuev=spf1 mx ~all.
DNS records will take a while (depending on our provider, up to a day) to propagate. Until they do, e-mails forwarded by our new e-mail server may get marked as spam or rejected outright.
Step 2: Receiving E-mail
We’ll first set up an e-mail forwarding server which will let we receive e-mails sent to our domains.
We will use Postfix as the e-mail server. Let’s start by installing the necessary packages. We will assume a Ubuntu server in the examples below; if you’re using a different distribution, please consult your distribution’s documentation for the right commands.
$ sudo DEBIAN_FRONTEND=noninteractive apt-get install postfixIn the above command, we skip the debconf configuration UI with DEBIAN_FRONTEND=noninteractive as we will edit the configuration files directly.
/etc/postfix/main.cf
Open up /etc/postfix/main.cf in your favorite editor. This file will come pre-populated with a bunch of config options and comments. Replace the contents of the file with the following (you can comment out the original contents for reference):
# /etc/postfix/main.cf

# Host and site name.
myhostname = myserver.example.com
mydomain = example.com
myorigin = example.com

# Virtual aliases.
virtual_alias_domains = example.com
virtual_alias_maps = hash:/etc/postfix/virtual
The first few lines are pretty straightforward; they tell Postfix how to identify itself to the world. The last two lines tell Postfix to forward e-mails sent to <whatever>@example.com to another e-mail provider (Gmail), and that the forwarding is configured in the database file /etc/postfix/virtual.
/etc/postfix/virtual
Let’s now open up /etc/postfix/virtual and fill in our forwarding configuration:
# /etc/postfix/virtual

# Forwarding mapping, one from-to address pair per line. The format is:
#     <forward-from-addr> <whitespace> <forward-to-addr>
john@example.com        john123@gmail.com
We can add as many forwarding rules as you want, one on each line. We can use any number of tabs / whitespaces between the forward-from and forward-to addresses.
Update lookup table
It turns out that Postfix doesn’t actually read /etc/postfix/virtual (surprise!); instead, what it reads is a lookup table generated from it. So, let’s generate the lookup table from our /etc/postfix/virtual:
$ sudo postmap /etc/postfix/virtualNote: we must re-run this command every time we modify /etc/postfix/virtual!
(Re)start Postfix
It’s now time to (re)start Postfix with our new configuration:
$ sudo postfix start
$ sudo postfix reload
Testing
We should test our brand-new Postfix server by sending an e-mail to our forward-from address. You might want to check out these tutorials for testing directly with the telnet command.
If you received the e-mail in your Gmail inbox, congratulations! Otherwise, check the Postfix logs at /var/log/mail.log (or with journalctl -u postfix if using Systemd) for errors. The most likely cause of issues is that DNS records have not propagated yet, in which case we’re likely to see a "rate limited" or "rejected for spam" type error message.
If we only want to receive but don’t care about sending e-mails as john@example.com, then this is all we need.
Otherwise, let’s move on to configuring Postfix to support sending e-mails from Gmail.
Step 3: Sending E-mail
Gmail requires a relay server (a server that will send e-mails to their destination on behalf it) to speak TLS, which protects the communication between Gmail and the relay server.
We will use Cyrus SASL for this task. To install:
$ sudo apt-get install sasl2-bin libsasl2-modulesUser name & password
Open relays are a terrible idea. We want to protect our e-mail server with a user name and password so that it will let Gmail send e-mails through it, but block spammers and other evil actors.
Cyrus SASL supports several backends for storing user names and passwords, including MySQL and PAM. However, we will go with the simplest backend — a plain database file.
Let’s create the user name / password database file in the default location /etc/sasldb2, with a single user named smtp (we can change the user name to anything we want):
$ sudo saslpasswd2 -c -u example.com smtpVerify with:
$ sudo sasldblistusers2Now, we make sure only Postfix can read this file:
$ sudo chmod 400 /etc/sasldb2
$ sudo chown postfix /etc/sasldb2
Lastly, we tell Cyrus SASL to use the file-based database to authenticate. Create the file /etc/postfix/sasl/smtpd.conf:
pwcheck_method: auxprop
auxprop_plugin: sasldb
mech_list: PLAIN LOGIN CRAM-MD5 DIGEST-MD5 NTLM
log_level: 7
SSL Certificate
We need an SSL certificate to enable TLS. While a proper SSL certificate signed by a Certificate Authority (CA) can be pricey, it turns out that a simple self-signed certificate suffices and works just fine.
So, let’s generate one.
- Generate an RSA private/public key pair. Note that you MUST supply a password to this command; the password will be removed in step 3.
- Generate a Certificate Signing Request (CSR). Make sure to enter
myserver.example.comwhen prompted for the "Common Name". - Remove RSA private/public key password.
- Generate a self-signed certificate. In the example, the generated certificate will be valid for 10 years.
- Create a PEM file.
- Move and protect the PEM file.
Note: Make sure to protect the generated private key and certificate with care!
Relay server
The final step is to configure Postfix to enable relaying of e-mail on behalf of Gmail.
Let’s open up /etc/postfix/master.cf. This file should already contain a bunch of config options, some of which are commented out. Uncomment the lines starting with submission and edit them to match the following:
submission inet n       -       n       -       -       smtpd
  -o syslog_name=postfix/submission
  -o smtpd_tls_security_level=may
  -o smtpd_tls_cert_file=/etc/postfix/example.pem
  -o smtpd_sasl_auth_enable=yes
  -o smtpd_reject_unlisted_recipient=no
  -o smtpd_relay_restrictions=permit_sasl_authenticated,reject
  -o milter_macro_daemon_name=ORIGINATING
A Postfix restart is due after all these changes:
$ sudo postfix reloadIf all went well, you should see Postfix serving a relay server, protected by our user name and password in /etc/sasldb2, on port 587.
Step 4: Configure Gmail
Finally, let’s log in to Gmail and tell it about our brand new server. (Note that the new Inbox UI does not yet support all the settings available in the legacy interface at the time of writing, so these instructions apply to the legacy interface.)
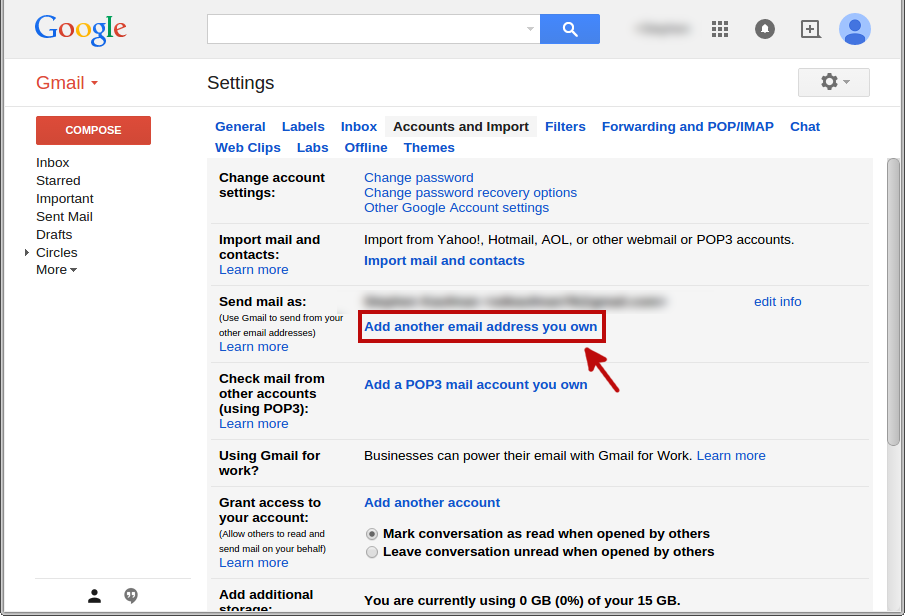
Let’s go to Settings > Accounts and Import and click Add another email address you own.
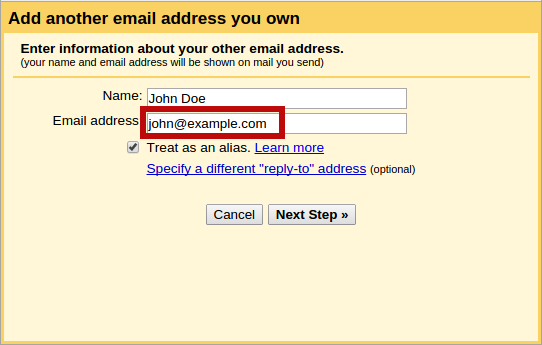
In the dialog that pops up, fill in our target e-mail address and click Next Step.
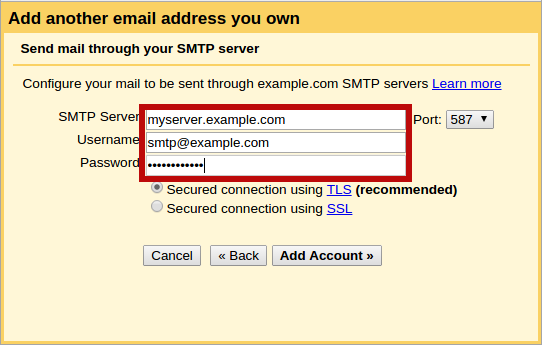
In the next dialog, enter the address of our e-mail server (myserver.example.com), and the user name and password we set up using saslpasswd2 above. Make sure the user name is suffixed with our domain name (so smtp@example.com rather than just smtp). Check that the correct port (587) and the correct security protocol (TLS) are selected, then click Add Account.
If all goes well, we should see a dialog like the following:
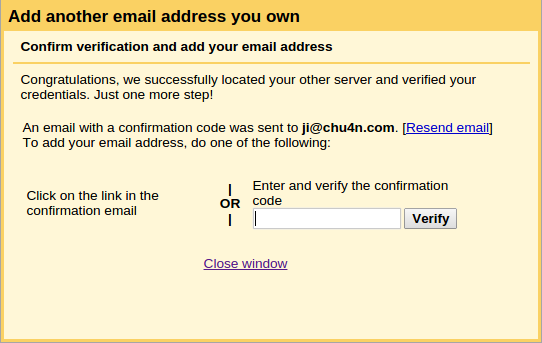
And we should receive an e-mail, forwarded by our mail server set up in the first part, to our john123@gmail.com address. Click on the link inside the e-mail and we’re done!
Now, in any e-mail compose / reply window, you should be able to select john@example.com in the drop-down list next to "From". Congrats!
If, on the other hand, you see an error like the following:
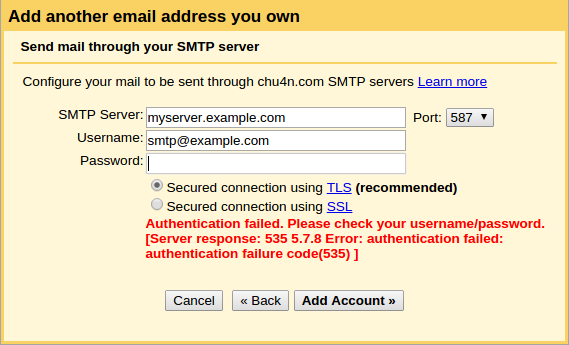
You should check the Postfix logs at /var/log/mail.log (or with journalctl -u if using Systemd) for any errors.
postfix
[Optional] Step 5: Setup DKIM and SRS
DKIM, short for DomainKeys Identified Mail, is e-mail validation system for preventing e-mail spoofing. Google recommends setting up DKIM; if we don’t, the e-mail messages that we forward to Gmail have a higher probability of getting marked as spam.
SRS, short for Sender Rewriting Scheme, is a relatively new standard that e-mail forwarding servers are recommended to adopt, and it also helps reduce the likelihood of our forwarded e-mail messages getting marked as spam.
Thus, while technically optional, it’s a good idea to configure our Postfix server to support both these standards. See my follow-up tutorial on Setting Up DKIM And SRS In Postfix for a detailed step-by-step guide.
Conclusion
In this post, we have set up a Postfix e-mail server that accomplishes the following:
- E-mails sent to
john@example.comis received by Postfix onmyserver.example.comport 25, and forwarded tojohn123@gmail.com; - Gmail will let you select
john@example.comas a "from" address when composing / replying to an e-mail, and will relay such e-mails through Postfix onmyserver.example.comport 587 using a configured user name / password combination.
I hope you found this guide useful, and if you have any thoughts / questions, you’re more than welcome to leave a comment below. Cheers!